凌云的博客
行胜于言
跟我一起学Git (八) 修改提交
分类:Git| 发布时间:2014-04-06 14:39:24
本文主要讲怎么修改提交历史,需要注意的是, 如果你的代码库是共享的,最好不要修改已经公开的那部分提交。
使用 git reset
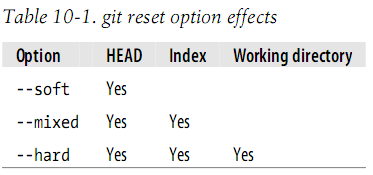
git reset用于将HEAD引用到一个特定的提交,一共有三种主要形式的git reset
- git reset --soft commit --soft只会修改HEAD引用到给定的commit
- git reset --mixed commit --mixed修改HEAD引用到给定的commit,并且index也会修改为对应的commit的tree结构,这是默认的选项
- git reset --hard commit --hard修改HEAD到引用到给定的commit,并且index也会修改为对应的commit的tree结构,并且工作目录也会修改为对应的提交的内容
git reset命令也会将原先的HEAD保存到ORIG_HEAD
下面来看看一些使用git reset命令的例子:
下面的例子将文件从index中删除
$ git add foo.c
# Oops!  Didn't mean to add foo.c!
$ git ls-files
foo.c
main.c
$ git reset HEAD foo.c
$ git ls-files
main.c
另一个常见的使用git reset的情况是回退到当前分支的上一个版本
$ git init
Initialized empty Git repository in /tmp/reset/.git/

$ echo foo >> master_file

$ git add master_file

$ git commit -m"Add master file to master branch"
[master (root-commit) 5358ab0] Add master file to master branch
1 file changed, 1 insertion(+)
create mode 100644 master_file

$ echo "more foo" >> master_file

$ git commit master_file -m "Add more foo"
[master 4b82f48] Add more foo
1 file changed, 1 insertion(+)

$ git show-branch --more=5
[master] Add more foo
[master^] Add master file to master branch

$ git reset HEAD^
Unstaged changes after reset:
M       master_file

$ git show-branch --more=5
[master] Add master file to master branch

$ cat master_file
foo
more foo
另外,最好不要使用git reset修改HEAD到其他分支的提交上
使用 git cherry-pick
git cherry-pick commit 会将 commit 的修改应用到当前分支
git cherry-pick通常用于将其他分支的修改应用于当前分支。
例子:
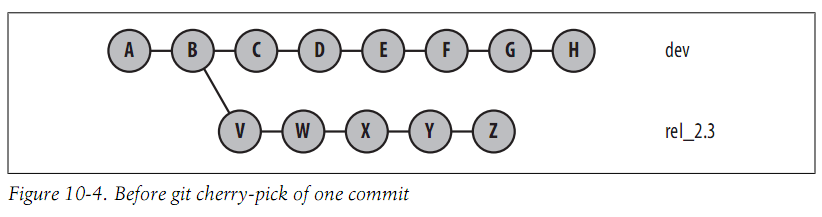
假设F修复了一个BUG,选择需要将其应用到rel_2.3分支中
$ git  checkout rel_2.3
$ git cherry-pick dev~2
现在提交图变为:

git cherry-pick另外一个常用的地方是在一个新的分支重新创建一系列的提交
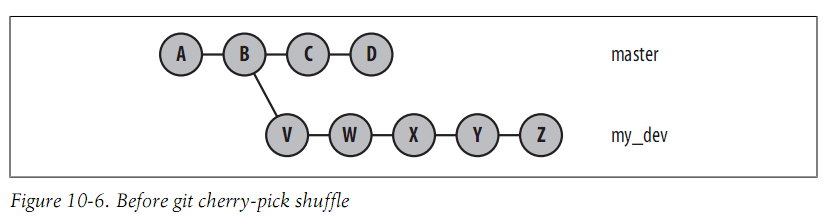
如上图所示,如果想在master分支创建Y,W,X,Z,需要使用如下命令:
$ git checkout master
$ git cherry-pick my_dev^      # Y
$ git cherry-pick my_dev~3     # W
$ git cherry-pick my_dev~2     # X
$ git cherry-pick my_dev       # Z
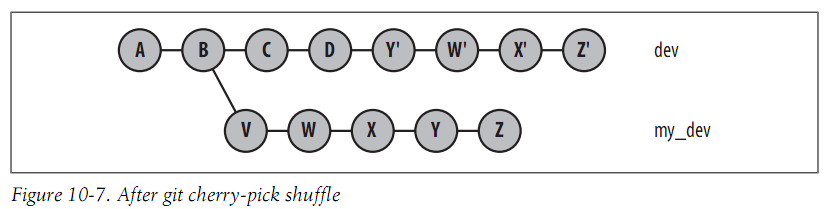
之后的提交历史如下:
使用 git revert
git revert commit 命令实际上是git cherry-pick commit的相反。它创建给定提交的相反。
下面给出一个例子:

$ git revert master~3 # commit D
结果为:

reset,revert和checkout
- git reset用于修改已有的提交历史
- git revert用于通过创建一个相反的提交来撤销已有的提交,这种方法通常用于要撤销的提交已经共享出去的情况
- git checkout用于签出特定分支,此命令并不会修改提交历史
修改最近的提交
可以通过 git commit --amend 来修改最近的提交
Rebasing提交
git rebase命令用于修改一系列的提交基于的提交。
例如有下面的提交历史:
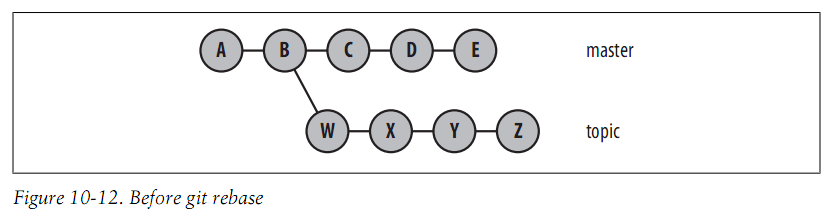
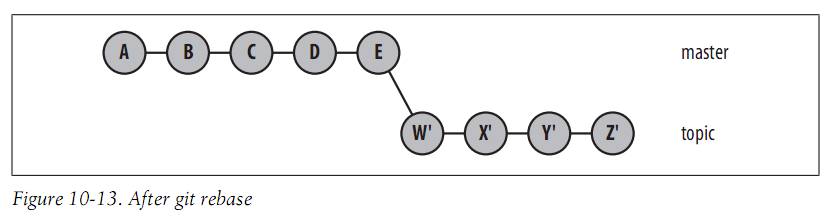
topic分支是基于B创建的,现在想修改topic分支使其基于E 可以使用以下命令:
$ git checkout topic
$ git rebase master
或者:
$ git rebase master topic
另外通过git rebase --onto命令也可以将整个分支转移到另一个分支。
例如:
![]()
可以通过以下命令将feature分支转移到master分支
$ git rebase --onto master maint^ feature
转移后的提交历史如下
![]()
使用git rebase -i
通过git rebase -i/--interactive命令可以修改已有的提交并将提交保存到当前分支或者其他分支
例子:
$ git init
Initialized empty Git repository in /tmp/rebase/.git/


$ cat > haiku
Talk about colour
No jealous behaviour here
^D
$ git add haiku

$ git commit -m"Start my haiku"
[master (root-commit) a734f10] Start my haiku
1 file changed, 2 insertions(+)
create mode 100644 haiku
现在你决定用美式的"color"替换掉英式的"colour"
$ git diff
diff --git a/haiku b/haiku
index 0c30ad3..20cb449 100644
--- a/haiku
+++ b/haiku
@@ -1,2 +1,2 @@
-Talk about colour
+Talk about color^M
No jealous behaviour here

$ git commit -a -m"Use color instead of colour"
[master a8874b4] Use color instead of colour
1 file changed, 1 insertion(+), 1 deletion(-)
最后,你添加最后一行然后提交
$ git diff
diff --git a/haiku b/haiku
index 20cb449..3f7527c 100644
--- a/haiku
+++ b/haiku
@@ -1,2 +1,3 @@
Talk about color
No jealous behaviour here
+I favour red wine^M

$ git commit -a -m"Finish my colour haiku"
[master 0b9d1ce] Finish my colour haiku
1 file changed, 1 insertion(+)
然而你又决定将所有的英式"ou"替换为美式的"o"
$ git diff
diff --git a/haiku b/haiku
index 3f7527c..4c94b8f 100644
--- a/haiku
+++ b/haiku
@@ -1,3 +1,3 @@
Talk about color
-No jealous behaviour here
-I favour red wine
+No jealous behavior here^M
+I favor red wine^M

$ git commit -a -m"Use American spellings"
[master 392da1c] Use American spellings
1 file changed, 2 insertions(+), 2 deletions(-)

$ git show-branch --more=4
[master] Use American spellings
[master^] Finish my colour haiku
[master~2] Use color instead of colour
[master~3] Start my haiku
当你查看提交历史时,你决定先完成文件haiku的编写再改它的格式
[master] Use American spellings
[master^] Use color instead of colour
[master~2] Finish my colour haiku
[master~3] Start my haiku
随后又发现两个修改格式的提交类似可以合并为同一个
[master] Use American spellings
[master^] Finish my colour haiku
[master~2] Start my haiku
你可以这样修改
$ git rebase -i master~3
pick a8874b4 Use color instead of colour
pick 0b9d1ce Finish my colour haiku
pick 392da1c Use American spellings

# Rebase a734f10..392da1c onto a734f10
#
# Commands:
#  p, pick = use commit
#  r, reword = use commit, but edit the commit message
#  e, edit = use commit, but stop for amending
#  s, squash = use commit, but meld into previous commit
#  f, fixup = like "squash", but discard this commit's log message
#  x, exec = run command (the rest of the line) using shell
#
# These lines can be re-ordered; they are executed from top to bottom.
#
# If you remove a line here THAT COMMIT WILL BE LOST.
#
# However, if you remove everything, the rebase will be aborted.
#
# Note that empty commits are commented out
在这里,你可以修改提交,合并提交,删除提交以及修改提交的顺序,需要注意的是这里的提交信息是按照从最旧的提交到最新的提交排序的
pick 0b9d1ce Finish my colour haiku
pick a8874b4 Use color instead of colour
pick 392da1c Use American spellings

$ git rebase -i master~3
# 修改,然后保存
Successfully rebased and updated refs/heads/master.

$ git show-branch --more=4
[master] Use American spellings
[master^] Use color instead of colour
[master~2] Finish my colour haiku
[master~3] Start my haiku
可以看到,提交历史已经改变了,下面让我们来合并两个修改格式的提交
pick 0b9d1ce Finish my colour haiku
pick a8874b4 Use color instead of colour
pick 392da1c Use American spellings
修改为:
pick 0b9d1ce Finish my colour haiku
pick a8874b4 Use color instead of colour
squash 392da1c Use American spellings
修改完后,结果为:
$ git show-branch --more=4
[master] Use American spellings
[master^] Finish my colour haiku
[master~2] Start my haiku
rebase和merge
和简单地修改提交历史相比,rebase有些副作用你需要注意
rebase一系列提交和合并两个分支类似:两种情况都是新的分支的头都拥有两个分支的提交合并起来的效果 有时你可能会想:我应该使用merge还是rebase?
rebase会导致Git生成一系列全新的提交。他们拥有全新的SHA1码。 看看下面的情况:
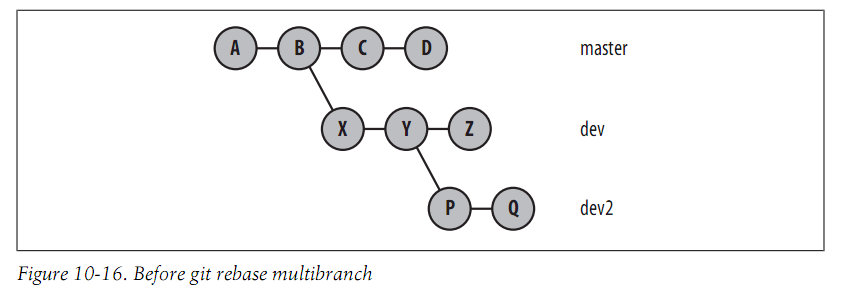
然后你执行下面的代码:
# Move onto tip of master the dev branch
$ git rebase master dev
然后你希望等待下面的结果:

但是,实际情况是这样的:
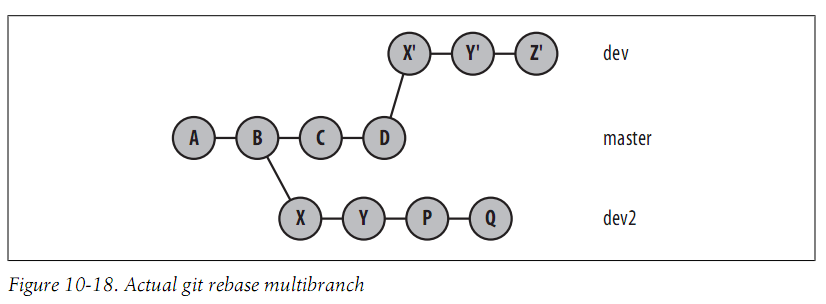
X',Y'和Z'都是根据X,Y和Z生成的全新的提交
$ git show-branch
* [dev] Z
! [dev2] Q
  ! [master] D
---
*   [dev] Z
*   [dev^] Y
*   [dev~2] X
* + [master] D
* + [master^] C
+  [dev2] Q
+  [dev2^] P
+  [dev2~2] Y
+  [dev2~3] X
*++ [master~2] B
如果你希望得到期望的结果,还需要以下操作
$ git rebase dev^ dev2
First, rewinding head to replay your work on top of it...
Applying: P
Applying: Q
$ git show-branch
! [dev] Z
* [dev2] Q
  ! [master] D
---
*  [dev2] Q
*  [dev2^] P
+   [dev] Z
+*  [dev2~2] Y
+*  [dev2~3] X
+*+ [master] D
再来看看下面的情况:
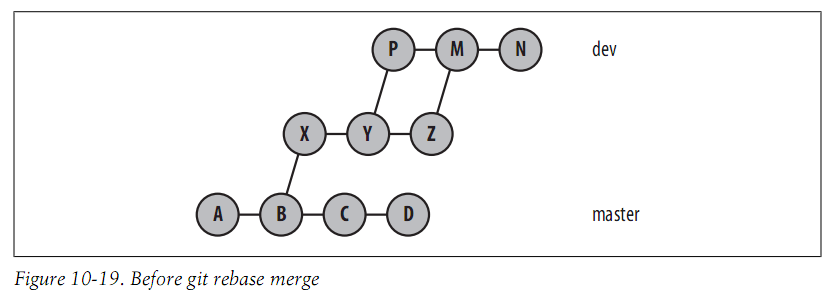
你执行:
$ git rebase master dev
First, rewinding head to replay your work on top of it...
Applying: X
Applying: Y
Applying: Z
Applying: P
Applying: N
然后期望得到:
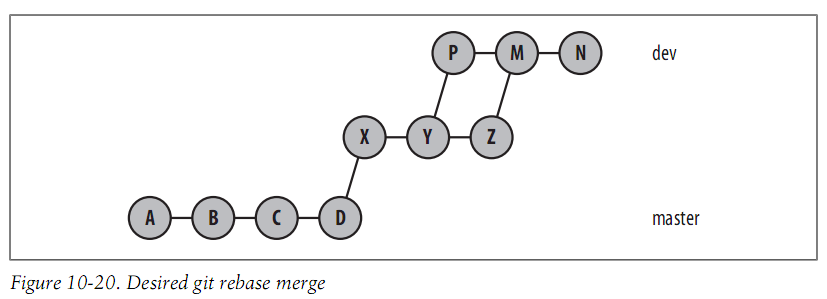
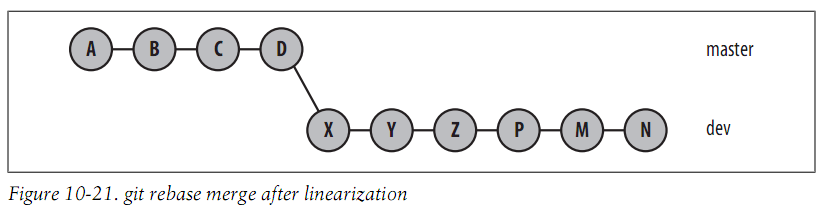
实际是这样的:
$ git show-branch
* [dev] N
! [master] D
--
*  [dev] N
*  [dev^] P
*  [dev~2] Z
*  [dev~3] Y
*  [dev~4] X
*+ [master] D
怎么回事?所有的提交都线性化了!实际上,当Git将dev分支从B移动时, 它需要找出master..dev的提交集然后进行拓扑排序,再在D上一个一个地提交排序后的集合。 因此我们说:“Rebase会将原先分支的提交历史线性化到master分支中。“ 如果你不关心提交的历史结构已经被改变,那么你已经完成工作了。 不过如果你希望显式地保留分支已经合并结构你可以使用--preserve-merges选项
$ git rebase --preserve-merges master dev
Successfully rebased and updated refs/heads/dev.

$ git show-graph
* 061f9fd... N
*   f669404... Merge branch 'dev2' into dev
|\
| * c386cfc... Z
* | 38ab25e... P
|/
* b93ad42... Y
* 65be7f1... X
* e3b9e22... D
* f2b96c4... C
* 8619681... B
* d6fba18... A
然后,现在结果为:
需要记住的概念如下:
- Rebase会重新提交为新的提交
- 已经不能到达的旧提交会被删除
- 任何用户的旧的rebase之前的提交会被搁浅
- 如果你有一个使用了rebase之前的提交的分支,你可能需要反过来rebase它
- 如果在其他代码库中有一个使用rebase之前的提交的用户,即使他已经移到你的代码库中,它们会依然保留一份拷贝;他们可能需要修复他们的提交历史。